This post contains Amazon affiliate links. Thanks to Thompson’s WaterSeal for providing the waterproofing wood stain used in this project.
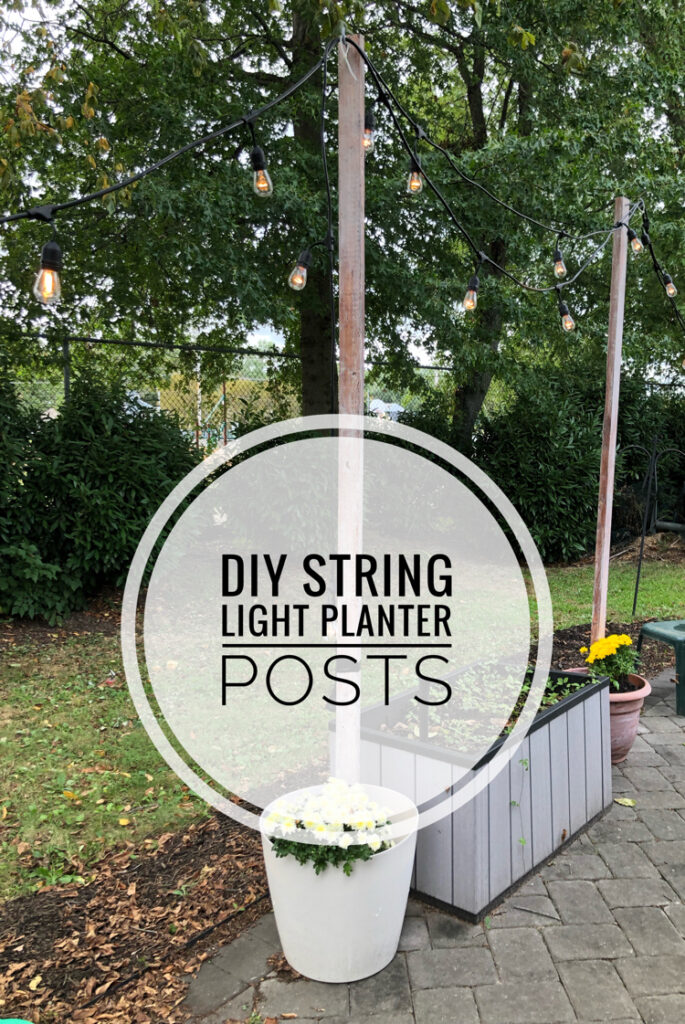
As a budget DIYer, I am always looking for ways to update my home without spending a lot. I love improving my backyard and garden. I recently added inexpensive lighting to my backyard by constructing DIY planter string light poles! These planter spring light posts are an easy and pretty way to brighten up a patio and backyard garden.
I have pinned this project many times and actually bought the Outdoor String Lights two years ago!
My daughters planned an evening dinner get together recently for their friends to be hosted on our patio. The problem is, our patio had only one lone back door light that leaves most of the patio dark.
I had to do something fast so my girls and their friends wouldn’t be dining in darkness. With that motivation, I pulled my project together in a week!
The timeline included shopping for the supplies, staining and whitewashing some 4x4s, mixing and pouring quick-setting cement, setting the poles, adding hooks to the poles, stringing the lights and planting mums in the planters.
I also threw in cleaning the patio, table and chairs, and mulching around the patio for good measure. Whew! My motivation for my string light posts was this project by Bungalow One 17.
This project was so easy, but it provides such great satisfaction! Who knew that adding inexpensive outdoor lighting to my home’s patio could add value to my home in such a satisfying way!
String Light Planter Pole Supplies
Cost: I had some of the items (like the stain, paint, zip ties and planters) already on hand. But I figure that to make 4 planters with string lights and posts will cost you less than $200.)
4x4s in a height of your choice
Flowers of your choice
How to Hang String Lights
I got most of the materials I needed for my project from Home Depot. To make my life easier, I ordered some of my supplies through the Home Depot app on my phone and picked up the supplies at my local Home Depot. My Home Depot filled my order in about an hour!
Then all I had to do was go to the customer service desk at the front of the store. Someone got my supplies and carted it out to the car for me! Perfect.
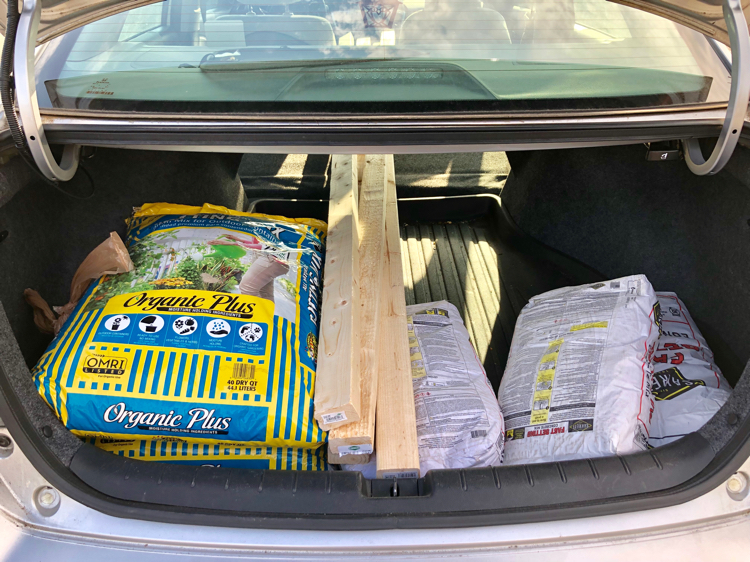
Note: If you buy 8 foot high 4x4s, you have to put the seats down in your car (so you can slide the wood through from your trunk.) Otherwise, you need a truck or van for them to fit!
Preparing & Setting String Light Posts
When I got my materials home, the first thing I did was stain the 4x4s. (I used an old wood pallet as a work surface.) I already had some Thompson’s Waterseal Waterproofing Stain on hand for this.
I bought a cheap dollar store brush to apply the stain and poured small amounts of stain into a clean plastic takeout container as I worked.
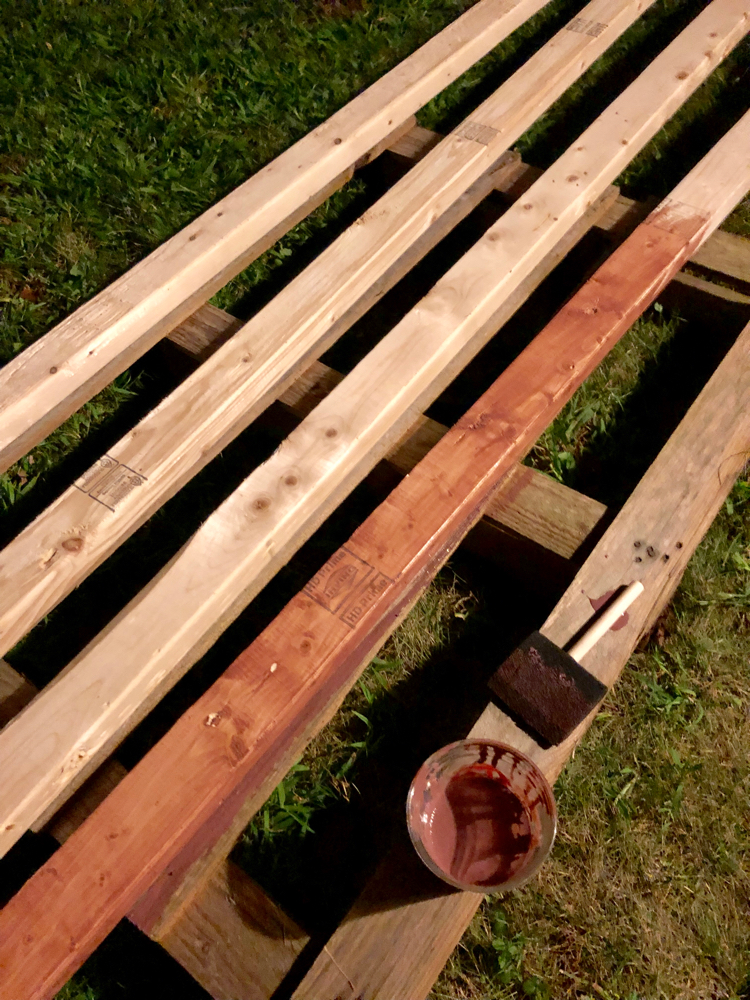
After staining the wood, I decided to add a whitewash to the stained wood. I watered down some white chalk paint that I had from a past project and painted over the stain. I love the new look!
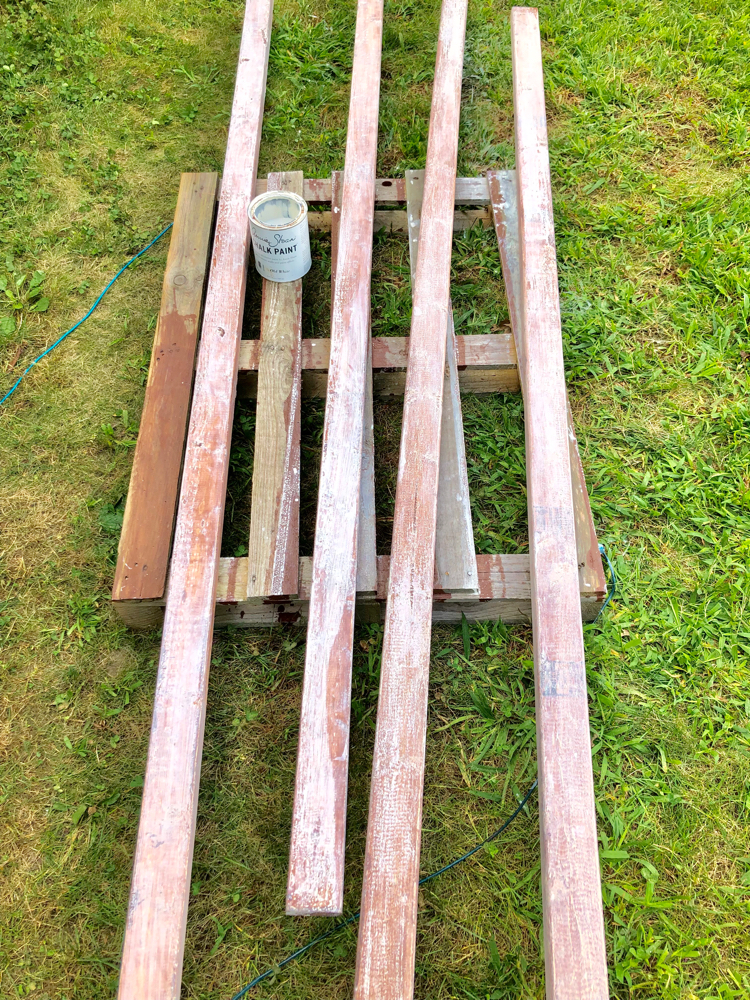
I put on some work gloves and a face mask and completely sanded the poles with some sandpaper while the paint was still drying. The sanding gave my whitewash effect an even look and got rid of some of the rough, splintery edges on the poles.
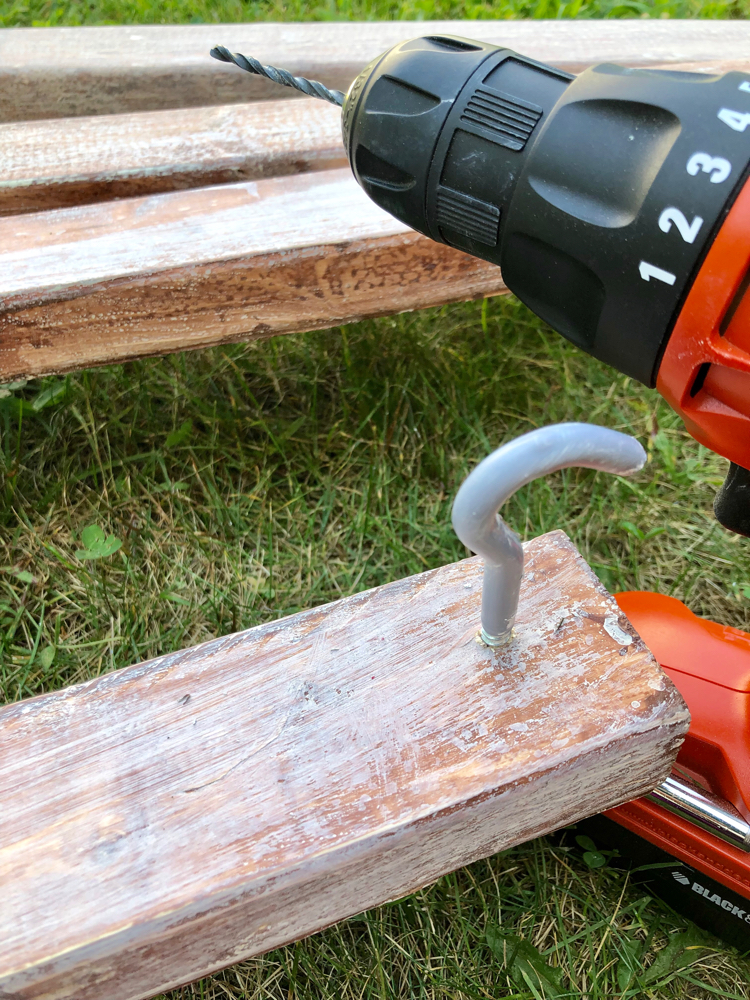
I used my Cordless Drill to make starter holes near the tops of my poles for the plant hooks. (These hooks now hold the string lights.) I screwed the hooks in by hand. (If you don’t have a drill, you could probably get the screws in by making a small hole in the post with an awl.)
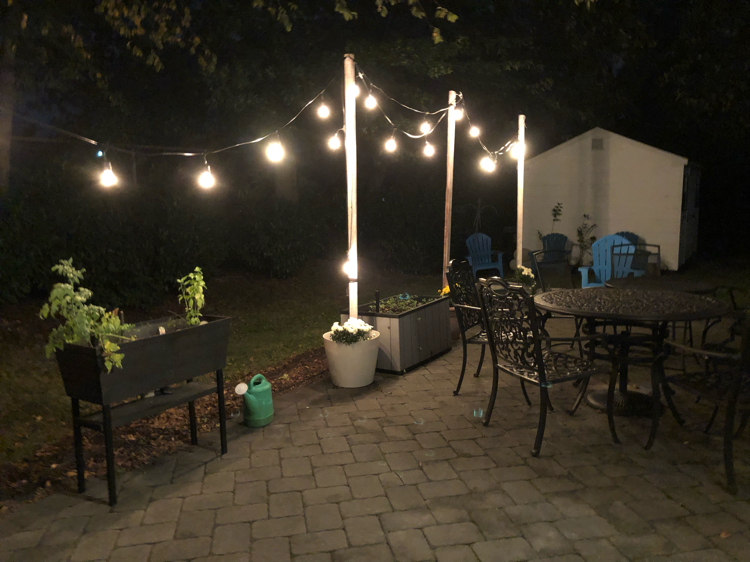
Then it was time to set the poles in the planters with the cement! I first set my large planters where I wanted them on my patio.
I worked on one planter at a time. It would be best to have a helper for this project. But since I was working on my own, I had to be creative!
Important tip: If you do this project on your own, be sure to have everything you need to set the poles — quick-setting cement, FrogTape, shovel and water — within arms’ reach before setting the poles.
To set each pole, I started out with a big roll of Frogtape on my arm. I placed the pole in the center of the planter and secured it with lots of FrogTape.
Wearing a disposable face mask, I dumped an entire bag of fast-set concrete into a planter, added water and mixed the concrete mix with a shovel until it started to set. I then moved on to the next planter. The fast-set concrete hardened a lot quicker than I expected it to!
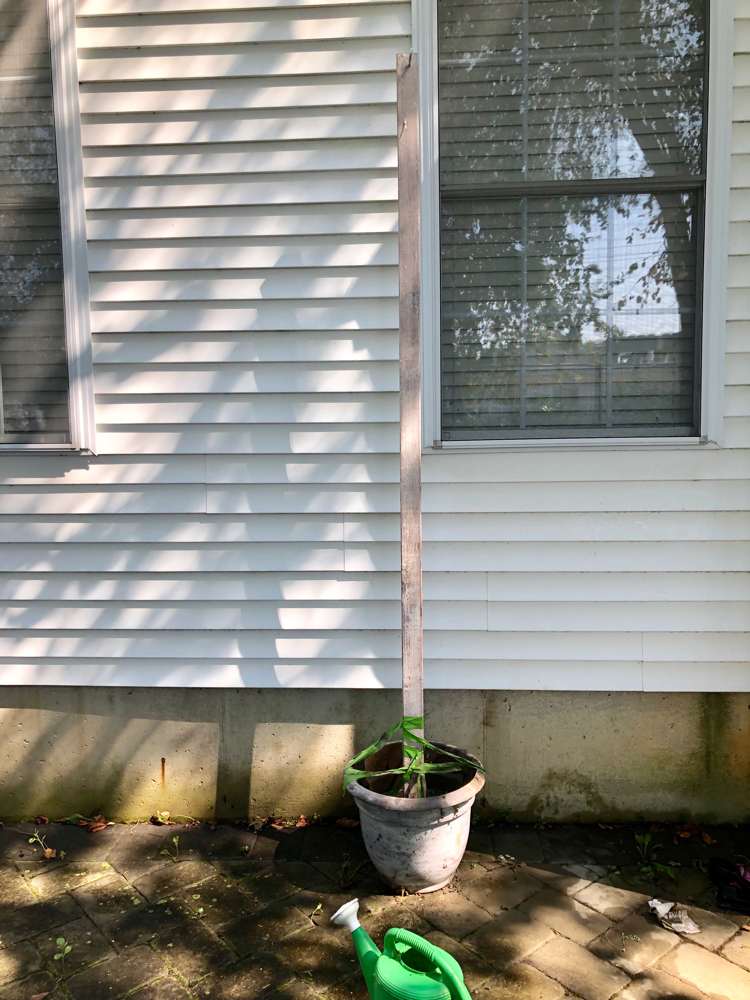
After the concrete in my planters had dried, I added potting soil on top of the concrete in each planter and added a mum to each planter.
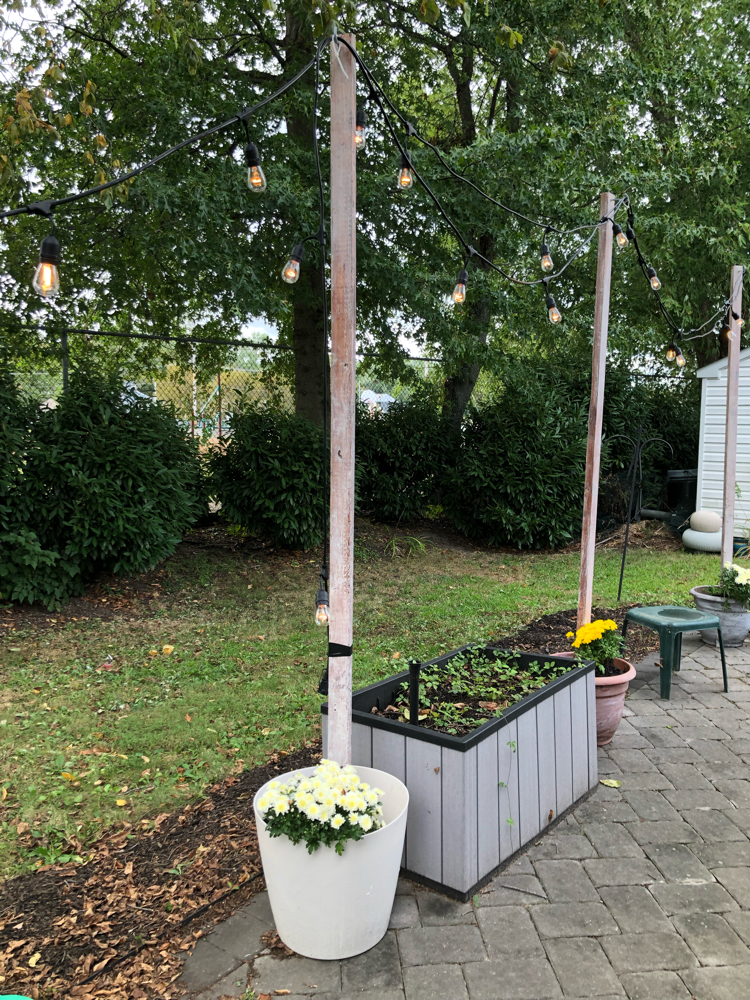
The planters give me an easy way to add seasonal color and pretty flowers to my backyard patio.
Then it was time to string the outdoor string lights. I’m only 5’5”, and all I needed to reach the top of the light poles was my trusty and sturdy Rubbermaid Step Stool. It’s useful for so many projects!
Hanging String Lights
Important tip: To reduce the risk of breaking the bulbs for your string lights, screw them in after the string lights have been hung from your light poles.
I used an outdoor extension cord to reach my DIY string light poles from my patio’s electrical outlet. I looped the string lights over the hooks at the tops of my DIY light poles and secured them with Zip Ties. Hanging the string lights only took a few minutes!
After my DIY string light poles were up and the lights were strung, I plugged in the extension cord. I then had a beautifully lighted patio, plus some newly planted flowers!
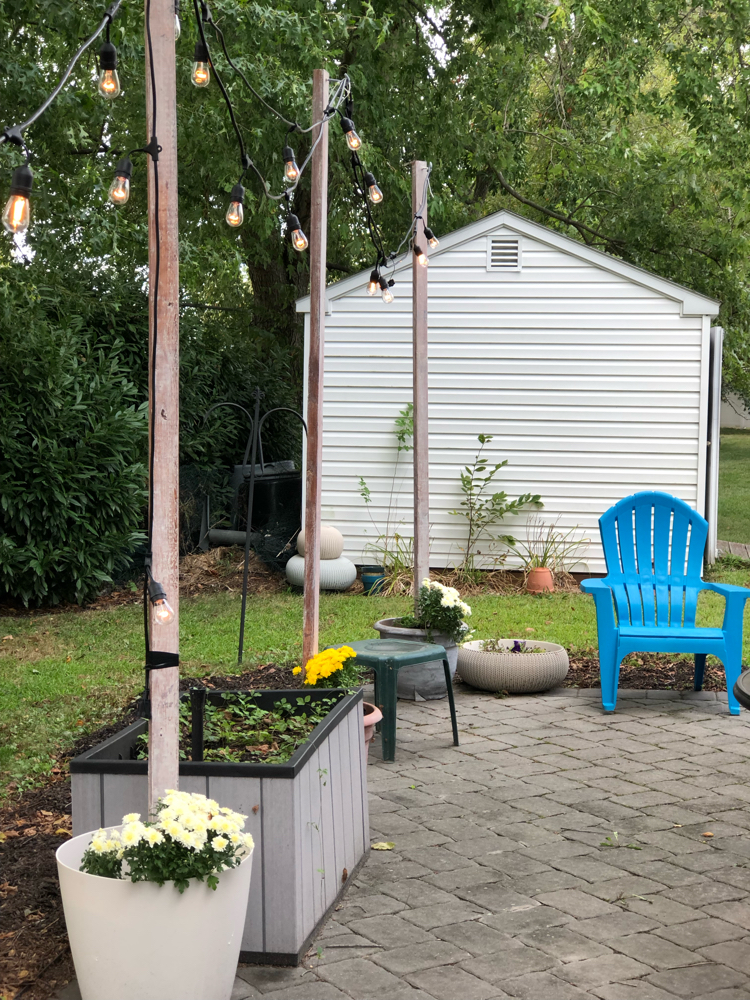
The lights and flowers have made our patio a much more appealing space!
To add even more ambiance to my daughters’ dinner party, I bought a set of Flameless Battery Operated Candles. The candles are made with real wax, have their own remote control, and can be set to flicker like real candles!
My daughters and I really enjoy our new lighted patio!
We were featured in a Redfin article! Check it out here: Outdoor Upgrades that Add the Most Value to Your Home | Redfin powered by Rocket
If you like, check out some of my other recent home DIY projects:
Discover more from momhomeguide.com
Subscribe to get the latest posts sent to your email.
Oh, my goodness! You’ve been super busy! I love the look of your completed project. The potted string lights are a perfect solution to brighten your patio! -Marci @ Stone Cottage Adventures
What a great project! I know your daughters really appreciated the effort you went to!
That is quite an ambitious project and it turned out fantastic!! I love this. Pinned.
This is such a neat idea and an easy way to add ambiance to an outdoor space.
Those lights give your space a big wow factor! I’m sure your daughters had a great time with their friends. You’ll be enjoying that patio for years to come! Great job Lauren!
Thanks, Rebecca! Thank you for stopping by! We adore the new lights.
Wow, what a cool project, Lauren! I love the lights you chose. It adds such a fun vibe to the space.
So, did you catch the DIY bug more than what you had before? Those mums were a nice touch!
Hi, Julie! My girls really wanted outdoor lighting and that’s the only way we were going to get it!
I love this, Lauren! It came out great and I am sure your daughters are enjoying it!