*This post contains Amazon.com affiliate links.
I am going to the Haven Conference this week, so I have been very busy packing and getting ready! But before I leave for the conference, I want to share with you what I did with the framed scrapbook art I created – I made a new gallery wall for my newly furnished living room! I’d love to show you how to create your own gallery wall!

I just love how my new living room came out! The room used to be pretty much empty and only housed a piano and two toy chests. Now, it’s a spot where my daughters and I like to sit and read, or look out the window at the birds and our flower garden.

My home’s new living room with bright DIY pillows and a chevron rug.
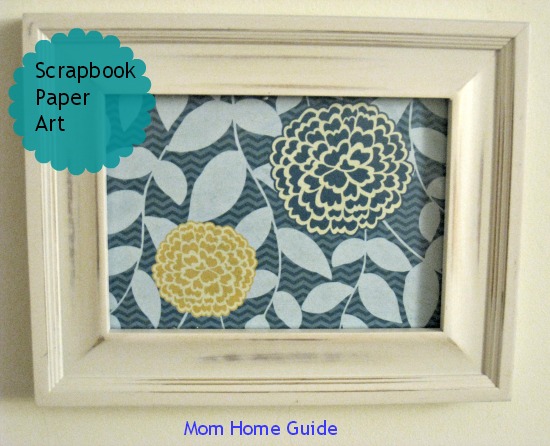
As I shared in my framed scrapbook art post, I created fun and colorful new art for my living room by framing some of my favorite scrapbook paper prints – I was able to purchase a whole pad of scrapbook paper for only about $5! I also found some inexpensive frames in beautiful colors for only about $5 each, too.
Designing a Scrapbook Paper Gallery Wall
Supplies
– scissors
– Command sawtooth picture hangers
(one for each frame)
To design my gallery wall, I first traced my frames onto scrap paper.

After cutting out the shape of each frame, I then hung my scrap paper on my gallery wall with tape – that way I could plan out my gallery wall and get a good idea of what it would look like when it was done. I carefully marked where I wanted to hang each frame before taking my scrap paper off the wall.

I used some Command Sawtooth Picture-Hanging Hooks to hang my framed scrapbook art. I love using Command hooks and hangers for hanging photos and art on the wall – I don’t worry about having to hang my art from a stud, and I don’t have to put any holes in the walls!

Hanging my Command hangers was quite easy – I simply followed the rather easy directions on the back of the Command hangers’ package. Once my picture hangers were on the wall, I let my picture hangers sit for an hour before trying to hang my pictures, so the hooks could properly adhere to the wall.

It only took a few minutes to hang my framed scrapbook paper art, but I can happily say that my framed scrapbook paper art has been hanging securely on my gallery wall for a few weeks now. I love how my gallery wall turned out!
This Post Was Shared At
Discover more from momhomeguide.com
Subscribe to get the latest posts sent to your email.
Such a cute idea to use scrapbook paper! So pretty, and easy to change when you’re ready for something different. It turned out really cute, Lauren!! 🙂
Thanks, Amy! I stopped by your blog, and just love you DIY large chalkboard. I need to make one of those before the school year starts up in September!
What a great way to add color and some fun patterns for cheap! Love the way it turned out. Looking forward to meeting you at Haven!
Thanks so much, Corey! Hope to see you at Haven! 🙂 Love your outdoor chandelier!
I love this idea! There are so many pretty scrapbook papers out there–pinning this to my home decor board!
Thanks so much, Carrie! Thank you for stopping by!